Brown Butter Ghee
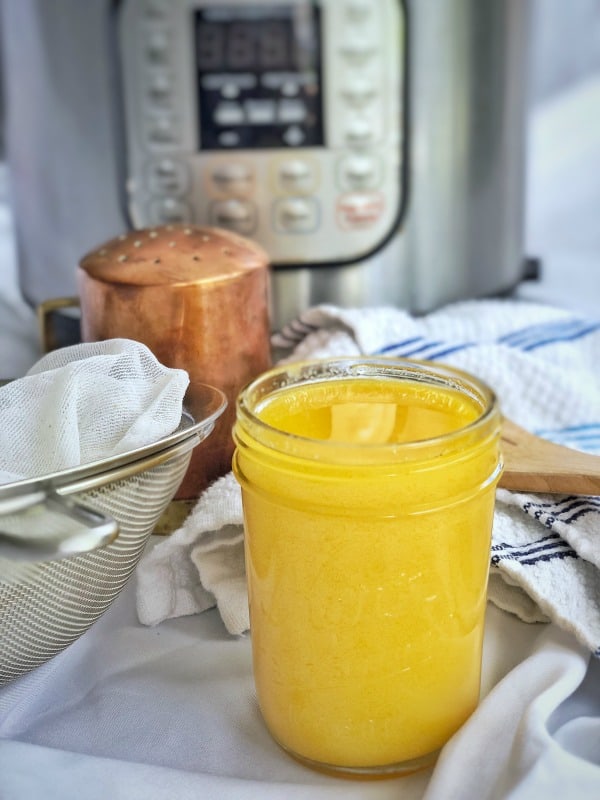
Turn a stick of butter into liquid gold! This failure-proof Brown Butter Ghee guide will show you how to make a great batch of ghee with decadent, caramelized flavor on the stove or in the Instant Pot.
Can you make brown butter ghee? Yes, Brown butter ghee can be made on the stovetop or by using your pressure cooker, and these easy-to-follow instructions will show you how it’s done. First, let’s discuss what this brown butter ghee stuff is all about.
💗 Why You’ll Love This Recipe
- Making ghee from stick butter is much cheaper than buying it pre-made.
- You can achieve the same deep, roasted flavor in a saucepan or pressure cooker.
- It’s a delicacy! The rich, nutty flavors of quality brown butter ghee can not be substituted with anything else.
- For Whole30 purposes, ghee is a perfectly acceptable butter substitution and an absolute game-changer.
- It makes Bulletproof coffee taste practically like dessert!
👉 Ghee vs. Brown Butter Ghee
Ghee has been used for centuries, especially in Indian cooking, but what exactly is this luscious liquid gold? It’s actually quite simple, and it begins with butter.
If you don’t tolerate butter, ghee and brown butter ghee are typically safe alternatives. Since the moisture and milk solids are removed, it has a high smoking point (higher than butter, actually) and is lovely to cook with. Let’s go over the stages.
- Clarified Butter: is butter that has been cooked just long enough that the moisture evaporates, and the milk solids can be skimmed from the top, leaving pure butterfat, aka clarified butter.
- Ghee: Clarifying butter is quick, while getting it to the ghee stage takes quite a bit longer. If you keep cooking the butter after the solids rise to the top, they will eventually drop to the bottom, toast, and emit a sweet-nutty flavor.
- Brown Butter Ghee: Letting the milk solids toast even longer is when the magic happens. The milk solids will begin to caramelize, releasing a decadent toffee-like flavor. You’ll know when it’s reached brown butter status because your home will smell heavenly.
🧈 Ingredients & Tools
- Grass-fed butter: Cows are a prime example of you are what you eat. When butter is made from milk sourced from cows fed a nutrient-rich grain-free diet, the milk typically tastes better -which ultimately means better tasting butter and better-tasting brown butter ghee. Butter from grass-fed cows is also higher in Omega-3 fatty acids, so it’s a better choice all around.
- Pressure cooker or saucepan: This guide includes directions for both. The incentive for using your Instant Pot is not having to stand over the pot and babysit.
- Cheesecloth, extra fine mesh strainer, or nut milk bag: to strain the ghee and remove the milk solids.
- Jars: sanitized glass jars for storage.
🥣 How To Make Brown Butter Ghee (Stovetop Instructions)
1️⃣ Clarify butter.
Cut the butter into smaller pieces and place them in a deep-rimmed saucepan over medium heat. Let the butter melt and cook until foam rises to the top.
2️⃣ Caramelize milk solids.
Lower the heat and let the butter continue to simmer until it becomes translucent and the milk solids sink to the bottom of the saucepan (about 30 minutes). Be sure to stir it occasionally to keep the milk solids from burning. The goal is to caramelize them so they release a sweet, nutty flavor.
3️⃣ Strain.
Remove the saucepan from the heat and pour the ghee through cheesecloth into a heat-safe sterilized jar to catch stray milk solids and imperfections.
4️⃣ Store.
Let cool before sealing the jar—store ghee in a dry, cool place or the fridge.
♨️ Instant Pot Brown Butter Ghee
1️⃣ Clarify butter.
Make sure the inside of the sleeve is completely dry, then add the butter. Program the Instant Pot to SLOW COOK on the normal heat setting. After about 2 hours, you’ll notice the milk solids have settled at the bottom.
2️⃣ Caramelize milk solids.
With the splatter guard attached, switch to SAUTE mode and cook for 5 minutes. Then, immediately remove the sleeve from the Instant Pot to let the residual heat finish caramelizing the milk solids.
3️⃣ Strain.
Let the liquid cool down, and then pour through cheesecloth into a clean glass jar.
4️⃣ Cool and store.
Let the ghee cool completely before sealing the jar—store ghee in a dry, cool place or in the fridge.
🧑🍳 Recipe Tips
- Buy butter in bulk! I like purchasing Kerry Gold Irish Butter from Costco to make ghee. It’s great-tasting, and you can’t beat the wholesale price.
- The longer the milk solids are left to caramelize, the better -just watch that they don’t burn. You’ll know when the solids are caramelizing because your house will start to smell like butterscotch.
- If you burn the milk solids, there’s no coming back from it. To prevent it from happening next time, note how it smells. Once it has a distinct candy-like aroma, the milk solids have begun caramelizing, and the ghee is well it’s on its way to being ready to strain.
🔀 Variations
Infuse your ghee with added flavor. For something on the sweeter side, check out my vanilla bean sea salt ghee and 4th & Heart copycat vanilla ghee. See below for more ideas:
- Indian Spiced Ghee – Stir in cinnamon, cardamom, and ginger.
- Herbed Ghee – Add toasted herbs like rosemary, sage, and thyme
- Mix-ins like cocoa powder, cinnamon, and nutmeg are great options.
🧊 Storing & Freezing
Storing: Ghee has a great shelf-life and can be stored at room temperature. Store your homemade ghee in a cool, dry place for up to 3 months. Properly sealed jars left unopened are good for up to 9 months.
Freezing: Store cooled ghee in freezer-safe containers in the freezer for up to a year. That in the fridge or on the counter.
❔FAQ
Yes! Just keep in mind that the ghee will have a saltier flavor.
Making ghee in the IP may result in a grainy texture as it cools down. This IS NOT a bad thing. Ghee with a gritty texture indicates it was done right!
Yes, check your local health food store or online. Lee’s Ghees, Pure Traditions, TinStar Foods, and 4th & Heart are good options.
☕ Ways To Enjoy
Make the most of your homemade ghee and use it instead of butter in your favorite dishes:
Baked Sweet Potato
Air Fryer Frozen Sweet Potato Fries (use ghee to coat the basket)
Baked Brie Mac and Cheese
Whole30 Bulletproof Coffee
3-ingredient Paleo Hot Chocolate

Brown Butter Ghee
Equipment
- 1 saucepan
- 1 cheesecloth or nut milk bag or extra fine mesh strainer
- storage jars
Ingredients
- 24 ounces grass-fed butter
Instructions
- Cut the butter into smaller pieces and place in a deep-rimmed saucepan over medium heat. Let the butter melt and continue to cook until the foam rises to the top.
- Lower the heat and let the butter continue to simmer until it becomes translucent and the milk solids sink to the bottom of the saucepan (about 30 minutes). Be sure to stir it occasionally to keep the solids from burning. The goal is to caramelize them so they release a sweet, nutty flavor.
- Remove the saucepan from the heat and pour the ghee through cheesecloth into a heat-safe sterilized jar to catch any stray milk solids and imperfections.
- Let cool before sealing the jar. Store ghee in a dry, cool place or in the fridge.
Notes
Instant Pot Instructions
- Make sure the inside of the sleeve is completely dry, then add the butter.
- Program the Instant Pot to SLOW COOK on the normal heat setting. After about 2 hours, the milk will have settled at the bottom.
- With the splatter guard attached, switch to SAUTE mode and cook for 5 minutes. Then, immediately remove the sleeve from the Instant Pot to let the residual heat finish caramelizing the milk solids.
- Let the liquid cool down a bit, and then pour it through cheesecloth into a clean glass jar.
- Let cool completely before sealing the jar. Store ghee in a dry, cool place or in the fridge.


Tried this out exactly as directed and it worked perfectly.
So glad you like it! Thank you!